Scenic Elements
I have already described some of the construction methods, and of the making of hills and mountains. Here are some of the methods I used in creating some of the other scenic elements.
Trees:
To make nice trees, I go out walking on the prairies in October, after the leaves have fallen, but before things are covered with snow. I look toward the ground, and I find many shrubs and weeds that looks as if they would make perfect HO scale trees.
I clip them and bring them up to the layout room. I have tried planting them in the wet hardshell, but since I do not usually put every thing in at one time, it is more usual for me to drill a hole and glue my tree stalk into that. I put all of my tree stalks in place first, and then I come back and put Woodland Scenics foliage on the trees. I use both the foliage net and the foliage clumps. I like the early autum setting, this way I can have green trees, together with some that have begun to turn red, yellow, and orange. From this photo, you can see that the trees loom well over this three story building. You might not find trees like this in North Dakota, but then you will not find hills and mountains like this out here either. Look around however, and you will always find trees as tall as these. Trees are a good thing to put on the lay out, and I will be putting many hundreds more on this layout. Where ever I am too lazy to do any thing else, there I cover the place with trees.
Signals:
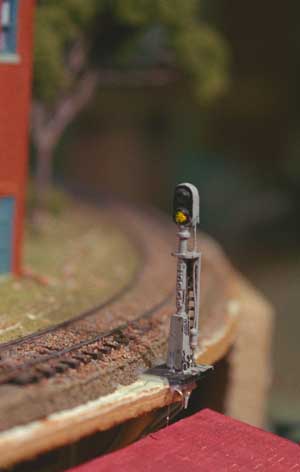
Signals are important to the safe operation of any railroad, regardless of its size. The ERR is no exception. All signals on this railroad are interlocking signals... After all I am mostly interested in knowing how my switches are set... and people love to look at them as they change color. I do not bother trying to use block signals, even with 106 trains a day on this layout, I am not worried about running in to the tail end of another train, but it is very easy to run an incorrectly set switch. This signal has a yellow and a green aspect since it is protecting the approach to the next signal. That signal, protecting the mainline from this yard branch has yellow over red indications.
I have made signals from many things, from scratch, but most are like this kit-bashed Bachmann signal. Ok, I'm cheap, and will not spend money on a fancy pre-made signal... this will do. First, I enlarge the openings to accomodate T-1 (1/8th") LEDs, on many I have started filing off the numbers. The LEDs are set in parallel, annode to cathode, that is the + red and the - yellow make one side of the circuit, while the -red and the +yellow make the other side. These bare wires run down the inside of the ladder, (and are installed before the ladder, which is put on last. A 1000 ohm resistor is seen near the bottom of the ladder. Depending on the polarity of the circuit, either the yellow or the green aspect will be displayed. Because I ues Tortise switch machines, the signal is conected to the same circuit as drives the turnout.
Yard Lighting:
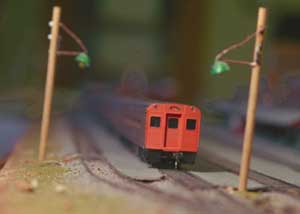
The train shown here is the cab end of the Fornost Local. The station platform is made of bookbinders' paper glued to cardstock. Black cardstock between the rails represents the rubber deck material found at modern grade crossings.Crews work and switch cars here at the fornost station late into the night, and these yard lights are set in the places where they are needed by the train crews for shifting trains. (They also tell me where the track magnets are from my control stand across the room)
The lamps are T-1 LEDs. The brackets holding the lamps are the power conductors. The insulators on the poles are indian seed beads, the "transformer" on the pole is a 1000 ohm resistor needed for the LED circuit. Not visible here is the very fine wire running between the poles. It is a single strand from a length of zip cord, and is the actual power conductor feeding the LEDs. The leads find their way to the power bus under the table disguised as guy wires. The reflectors are made by setting the LED in a cupped washer, and building up the reflector with modeling clay, and painting it green.
If someone shorts the circuit they will get a very prototypical arc.
Building Details:
A multitude of textures fills this backyard scene. The buildings are from DPM, each window has curtians or shades made from peices of cloth (used pajamas). Each building has a light, (3 12v bulbs in series), and are baffled with floors and walls so that only two or three windows are lit, but all can be looked into. There are many roof details. Ground cover is made of brick dust held in place with a thin white glue and sprinkled with ground foam.

History Construction Tour Story Wiring Timetable Maps Scenery Equipment