|
Construction of the Model Railroad... |
In the beginning there was the void, and an empty room. And lo... Br. Elias brought in some used lumber from an old machine shed that had been torn down. He cut the lumber into many pieces 40 inches long and he called the pieces "legs". And he saw that they were warped, but that was all he had to work with and so he used them anyway. And he took some more of the lumber, and he made more boards 36 inches long, and he drilled holes in these boards, and he called these boards, "joists". And he saw that these too were warped, but that was all he had to work with, and so he used them anyway. And he also found some longer boards, and these he called "runners", and behold, these too were warped.
So it came to pass that Br. Elias laid all of these construction materials out according to his plan, and from these he created two tables, each one three feet wide, and each one 12 feet long. And he saw that these new tables were much taller than the old ping-pong tables which he also planned to use. But this is how high he wanted them, and so he made the ping-pong tables be higher too. And then he rested, for he had created a new train table, and he saw that it would do.
|
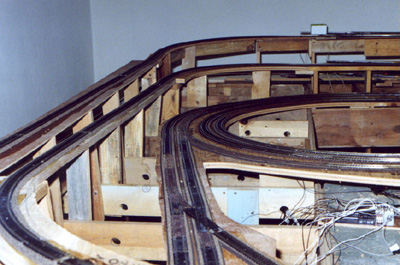
This is an early picture of the Eregion Railroad, it clearly shows the 'used lumber' construction methods. Some of the sub-roadbed is 3/4 inch plywood, in other places 1/4 material is used and braced from the under side. Atlas flex track is used, as is some older sectional track. All visible track is laid on cork roadbed, track in staging areas is laid on Celotex ceiling tiles. All ties and rails are painted, and the tracks are ballasted. Then paint is cleaned from the tops of the rails. The mainline runs through this photo three times on its run from Bree to Fornost. |
|
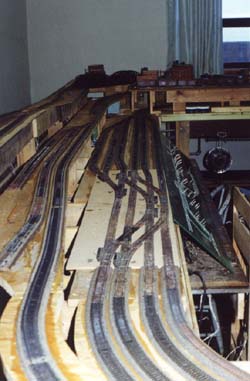
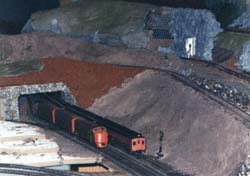
This view of the Railroad shows what will be the main station of Bree just above the operators console. The track switches in the foreground are snap-switches, purposely used because 1) I had them on had and could not afford to buy more; and 2) I wanted the compress the length of the switch area. This area is scheduled to be reconstructed in the year 2000 when all of the switches will be moved to the north end of the station, and the platforms lengthened to accommodate longer passenger trains. |
|
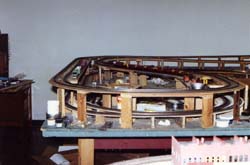
Here be one of the ping-pong tables. There are track loops on two levels at this end of the table, and on three levels at the far end. On the upper level here, Archet is to the left of the picture, and Coombe cuts diagonally across from upper left to lower right and then loops into Archet. The lower level accommodates a turning loop, and the outermost track on the lower level drops down to the table level, and runs around behind the entire layout poking out again on the far eastern end of the system. There are 8 staging tracks hidden on this loop. |
|
A large variety of scenic techniques were tried until a really good system was found. In the lower left corner I tried the stacked foam method... only I didn't have any foam, and so used Celotex ceiling tiles (we have tons of them, new in packages, that will never be used) They were harder to cut than foam, and were also much dustier and heavier. I also tried cloths dipped in wheat paste (like we used to protect pipe insulation), but this proved to be too thin, and would shrink when it dried, pulling up and derailing the trains. The sawdust from the Celotex carvings made the best 'papier-mache', but the quantity available to me was limited to only one section of hillside. |

|
Here, I have finally gotten the correct method for making mountains out of nothingness. The hillside is roughly framed out with wood, and a plastic netting. The papier-mache is made from newspapers. --The newspapers were rolled up tightly and taped in place, and then removed to a table saw where eighth inch cuts were take from the rolls, until all that remained was a huge garbage bag of newspaper dust.-- Then I made a wheat paste in a three gallon pail and mixed in the newspaper and a coloring agent. Getting the color was easy--- I went to the hardware store, picked out the color I wanted from the chips on the wall, took it to the owner and said "I want this color." He looks at me like I have two heads, and says "What do you want it in?" I hold up a gallon bottle and say, "here put it in this!" So he puts the colorant in the bottle, just as if it held a gallon of paint, and then I filled the bottle the rest of the way with water. You only need a cup full of this colored water to color a whole batch of papier-mache, and so here in this photo you see me building a rock covered hillside with a gray colored papier-mache. Later you will see an example of how I built a whole mountain using three colors of papier-mache at one time. The draw back on this stuff is that as it dries it will shrink and leave a few holes, but this is the base substance, and is to be covered with other landscaping and decorating materials, so I just ignore the holes in favor of this fast and cheap method of covering a large area. |

|
The Buckland extension was made only two years ago. The lower three staging tracks represent all points south. On the upper level is Buckland Station in the foreground. The lower level, as well as all of the rear loops will be concealed under a mountain. I am to fussy to bother with access trap doors, I shall simply build this mountain tall enough for me to stand inside of the mountain. This way I will have no trouble at all putting trains back on the tracks, or in making repairs, or cleaning tracks. This view is looking westbound from Buckland, from here the trains head into the staging tracks along the south wall, and then emerge again later from the east end of the layout. |

|
|
|
|
|
|
|
|
|
|
|
|
|